Thursday 29 January 2015

Cuts, Scratches, Bruises and the Perfect Black Eye

Health and Safety: If using a model place apron around the neck to protect clothing. 
Always ensure to run a client consultation to check for any infections, allergies or contraindications.
Wash hands thoroughly before touching the clients face.
Allow liquid latex to breath before applying.
Products Used:
- Cleanser, toner and moisturiser
- Supracolour Palette - Red, Yellow, Purple, Blue, Black
- Liquid Latex
- Scar Wax
- Foundation Palette
- Wound Filler
- Fake Blood
- Stipple Sponge
- Tu Plast
- Non Flexible Collodium 
- Palette Knife
- Foundation Brush
- Small Brush
- Non Latex Sponge

Process of Creating a Black Eye
(Look the at images of real black eyes for inspiration)
Old Black Eye
1. Ensure the eye is clear of all makeup using the cleanser, toner and moisturiser before applying any makeup. 
2. Begin by taking some yellow supracolour on a makeup sponge and apply to the socket of the eye, blending out with the edges of the sponge to create a natural old bruise effect. 
3. Using a small makeup brush place red supracolour around the outside of the eye socket and down the natural fold underneath the eye where the skin often darkens when tired. 
4. Blend out into the yellow using the makeup sponge, blending the edges is essential to creating a realistic look rather than visible makeup settled on the skin. 
5. Taking the same makeup brush work some purple tones into the deeper sections of the eye socket focusing in particular on the lower flesh and bone areas where the bruising would have impacted the most.
6. Blend the colours out again using the sponge.
7. Black may also be applied to darken any desired areas however this must be blended also.
8. The colours and placement would change as the black eye heals therefore on set photographing your work across all stages is essential for consistency.

Evaluation
I feel that creating this black eye was successful as I wanted to create the effect of an older bruising than that of a fresh one. The feedback in class was that I should probably use more purple tones to create a more effective black eye however I wanted the bruising to appear fading, however I do understand why more purple would be necessary for a fresh bruise. In addition to this in future I will probably make the tones of yellow and red bolder and more apparent as despite being vibrant to the naked eye, appear slightly washed out on camera. In future I think it will be necessary to create black eyes through a variety of healing stages to develop my understanding of how the skin texture and tone changes throughout brushing. Despite this I feel my first attempt at creating a black eye was effective and I enjoyed the painterly technique used to apply the makeup to the skin.

Creating Wounds "All about moulding"
Wounds and Grazes
1. Warm Plasto wax with the spatula on the back of the hand to make more pliable to the skin.
2. Optional to apply a layer of spirit gum to attach the latex to the skin however this is not always necessary.
3. Create sausage shape, add to the hand and being moulding the sides down into the skin.
4. Cleanser makes the process easier and blends the edges nicely into the area of skin, it is ideal to use the fingers for this.
5. Cut threw the wax with a palette knife and use the spatula to separate the wax out slightly, rougher edges add for a more authentic look.
6. Apply liquid latex or sealer over the wax and set with a hairdryer on cool.
7. Keeping the area a bit shiny from the latex adds a realistic swollen effect to the wound.
8. Use cleanser again to blend away the edges a little more and this will prevent any harsh edges being created by the latex and makeup.
9. Apply base colour using a foundation that matches the skin tone.
10. Add redness and tone using the supracolour palette.
11. Wound filler may also be added to the inside of the wound - it is a fibrous material that creates the texture of flesh.
12. Apply fake blood with a baby bud to the centre of the wound. Dirt or pus may also be added.

Creating Scratches
1. Ensure the area of skin is clean.
2.Taking a red toned supracolour or fake blood dab some onto a stipple sponge.
3. Swipe the stipple sponge across the chosen area to create grazed effect.
4. This is particularly effective on areas of bone such as knuckles and joints.
5. Dirt may also be added for effect.

Scars
1. Ensure the area is clean.
2. Making sure the end of the Tu-Plast nip is clean, drag the nose across the area of skin.
3. Use a hairdryer on cool setting to set the Tu-Plast.
4. Using a pin create roughness (optional).
5. Makeup as usual.
6. Apply fixer spray.

Split Lip
1. Make sure the area of skin chosen is clean.
2. Apply foam barrier to the lip.
3. Paint Non-flexible Collodium onto the skin.
4. Using spatula to create dent in the skin and dry with hair dryer if needed.
5. Apply more layers if needed.

Tuesday 20 January 2015

Historical Victorian Hair - Ringlets

Health and Safety: If using a model place apron around the neck to protect clothing. 
Always ensure to run a client consultation to check for any infections, allergies or contraindications.
Products Used:
- Small Curling Tong
- Apron
- Kirby Grips
- Sectioning Tail Comb
- Paddle Brush
- Small Hair Tie
- Sectioning Grips

Process of Creating Historical Victorian Hairstyles (Ringlets)
1. Place an apron around around the model to protect clothing.
2. Brush the hair through gently using a paddle brush to remove all knots and tangles before styling. 
3. Using a tail comb section the hair into a middle parting and then from the mid section of the head down to the back of the ears and pin out of the way using sectioning grips.
4. Using a paddle brush comb the back section of the hair into a ponytail and then twist into a bun, securing with a small hair tie. 
5. Divide the front section of hair into four sections on each side.
6. Taking the curling wand, roll the hair from the end in towards then face ensuring it wraps over itself rather than twisting.
7. This will prevent the ends from hanging outside of the ringlet.
8. Using the end of the tail comb support the curl as you release it from the curling wand.
9. Tuck any loose ends into the inside of the ringlet.
10. Repeat until you have four ringlets on each side of the head facing into the face.
11. To modernise the hairstyle slightly allowing for a more mid-Victorian style simply split the ringlets to soften the front of the style. 

Evaluation
Overall I feel creating this hairstyles went well as I was able to produce ringlets that were tightly wound and symmetrical on both sides of the face, which was an essential to the whole design of the look. That being said there were a few elements that I was not happy with in the finished look such as the bun and symmetry of the middle parting itself. I feel that if I had more hair on the doll I would have been able to create a more interesting bun that had more shape and body, realistically in Victorian hair styling the hair would be very long and therefore would be possible to plait and twist up into  bun. Furthermore I feel that by using real hair it would be easier to create a neat parting as the insert points on the dolls head are slightly unaligned and therefore make creating a perfect middle part difficult. This is something I can improve on in the future. 

Historical Victorian Hair - Plaits

Health and Safety: If using a model place apron around the neck to protect clothing. 
Always ensure to run a client consultation to check for any infections, allergies or contraindications.
Products Used:
- Apron
- Kirby Grips
- Sectioning Tail Comb
- Paddle Brush
- Small Hair Tie
- Sectioning Grips

Process of Creation
1. Brush hair through to remove all knots and tangles. 
2. Divide the hair into a centre parting.
3. Create another parting that divides from ear to ear.
4. Twist the hair at the back of the head into a mid height bun. 
5. If the hair is long enough this back bun may also be created through a plait as opposed to a twist.
6. Take the front section of hair at the front of the face and divide into a middle parting. 
7. Plait the front section into a plait of choice beginning from just below the eye. 
9. Repeat on the other side. 
10. Bring these plaits loosely backwards to hang just below the ear and looping back upwards into the bun behind. 
11. Fix with hairspray. 

Evaluation
This hairstyle was really simple to create but is an effective example of an early Victorian hairstyle worn by the Queen herself. I feel that this would be an appropriate hair design for my Estella as it is simple and could easily be worn by a young lady or a child which is where I am considering basing my version of the character. Although this design is highly simple it could easily be made more ornate by introducing different plaits to the style or decorating with jewellery/flowers, this is something to consider if I choose to complete such a style in my final assessment image. 

Monday 19 January 2015

Theatrical Ageing/Creping of the Skin

Health and Safety: If using a model place apron around the neck to protect clothing. 
Always ensure to run a client consultation to check for any infections, allergies or contraindications.
Wash hands thoroughly before touching the clients face.
Allow liquid latex to breath before applying
Products Used:
- Cleanser, toner and moisturiser
- Supracolour Palette - White, Mixing Green, Yellow and Red = Brown
- Thin Liner Brush
- Disposable Mascara Wand
- Non Latex Sponge
- Sectioning Grips
- Liquid Latex 
- Barrier Cream
- Stippling Sponge
- Plastic Bowl
- Kryolan Foundation Palette
- Foundation Brush
- Hairdryer
- Fixing Spray / Translucent Powder
- Powder Puff

Process of Theatrical Ageing
1. Place an apron around around the model to protect clothing.
2. Cleanse, tone and moisturise the face to ensure all makeup has been removed. 
3. Mix the Green, Yellow and Red from the Supracolour palette to create an appropriate brown shade to contour the lines of the face. 
4. Get the model to perform exaggerated expressions such as frowning, raising the eyebrows, pouting and smiling and fill the natural creases with a line of the brown supracolour using a thin brush.
5. Using a clean finger blend out the lines to create a more natural looking fold in the skin. 
6. Reapply supracolour into the creases to enhance the appearance of wrinkles.
7. It may help to look at the client through a camera first to see if more definition is needed. 
8. Taking a disposable mascara wand rub white supracolour through the ends of the brows and lashes to give the appearance of greying.
9. Using a stippling sponge and red supracolour, gently stipple onto areas such as the chin, nose and cheeks to create the illusion of broken veins. 
10. Apply a fixing spray or translucent powder once finished to hold the makeup in place (optional).

Evaluation
I feel that the process of ageing the skin in this way went well as it is a more artistic approach to theatrical effects makeup than using substances such as liquid latex or prosthetics. Although I was happy with how the makeup turned out in regards to making the model appear older than her actual age by far, I was told that for theatre the makeup would need to be far more dramatic to be seen properly by the audience despite being visible on camera. Personally the falseness of the ageing makeup is something I found difficult as you cannot afford to be delicate and subtle for the purpose of stage, instead the makeup needs to be very exaggerated. In future I know to enhance the natural creases of the face more and will probably use a darker shade of brown to achieve deeper visible lines and wrinkles. Overall however I was satisfied with how the makeup turned out. 
Process of Creping the Skin
1. Ensure the hands/area of skin that you are apply the latex to is clear from any dirt or cosmetics.
2. Apply a barrier cream to the area and work into the skin.
3. Pour the latex into a bowl and allow to breath for a few minutes.
3. Using clean hands stretch the area of skin where the latex will be applied.
4. Taking a latex free sponge dab a thin layer onto the area of skin. 
5. Allow to dry keeping the area stretched (a hair dryer can be used on the cool setting to speed up this process).
6. Apply a few layers ensuring there is no visible seam between the latex and the skin. 
7. Taking a foundation that matches the area of skin apply over the latex using a foundation brush to remove the visibility of the latex.
8. Powder or spray with a fixing spray if necessary. 

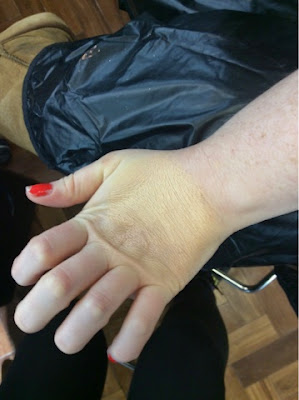
Evaluation:
Using liquid latex was a new experience for me as I had never used it previously, the first thing I noticed is that it smells vile and that really put me off using it on someone especially near the face. After airing the product this did reduce slightly however it still wasn't pleasant. I think it is cleaver how the latex causes the skin to wrinkle once stretched however this was a difficult thing to achieve on youthful hands as the skin is well elasticated and therefore doesn't stretch as far. Another problem was getting the foundation to match the skin tone as how it appears to the eye is not how it appears on camera therefore I will have to develop this better as the foundation seems to change tone on the latex. 

Thursday 1 January 2015

Contents

 List of products/materials used throughout unit
- Annotated Face Charts with list of products used – reflection on appropriateness
- Photographs of trials in studio (test shots), with evidence of working on 3 different models

ALL Technical Notes including:
- Consultation notes used in studio
-  Theatrical ageing/Creping of the skin
-  Historical Victorian hair
-  Cuts, scratches, bruises and the perfect black eye
-  Victorian hair style - Estelle and Miss Havisham
-  Practice look of Miss Havisham both hair and make up technical classes
-  Burns, how to recreate, with different products
-  Creating Miss Havisham, continuity image.
-  Creating Estelle image
-  Creating light scaring, using molds, how to attach to the skin, how to colour
-  Dark eyes and lips.
-  Contemporary Victorian Hairstyles, Inspired by American Horror


Your technical file must be checked and signed off by your technical instructor during the timetabled session at the end of the unit. Please see the teaching schedule for the date and time. THIS SHEET WILL NOT BE SIGNED OFF OUTSIDE OF YOUR TIMETABLED SESSIONS.